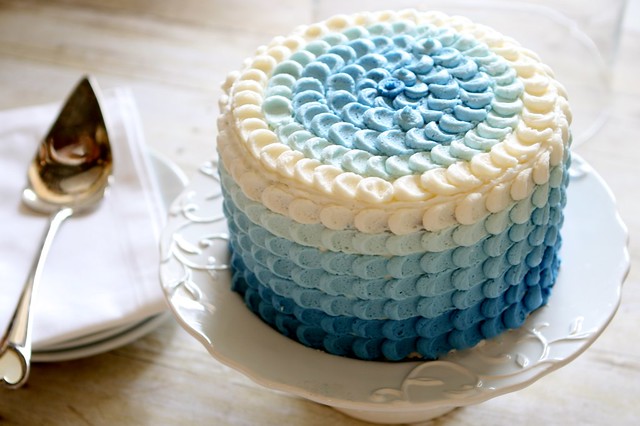
Stunning, isn’t it?
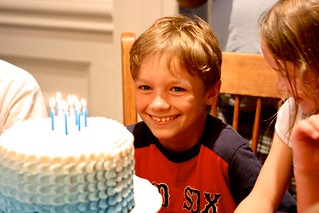
I made this beautiful cake for my sons 9th {sigh}Birthday.
Usually he gets a themed cake, like the soccer cake or the Sponge Bob cake, but I just was too busy this year to get all fancy for a more in-depth cake, so this is what he got.
He thought it was cool, and that’s all that matters.

I posted a photo of it on Instagram (follow me at Hungryhousewife) and Facebook and everyone loved it. I got emails requesting a tutorial and y’all know I aim to please.
Pretty sure I got all the tutorial bases covered, a video, on the cake and just icing. I hope you all find it useful!
And if you are short on time and don’t feel like watching the video, here is a photo tutorial.
What you will need
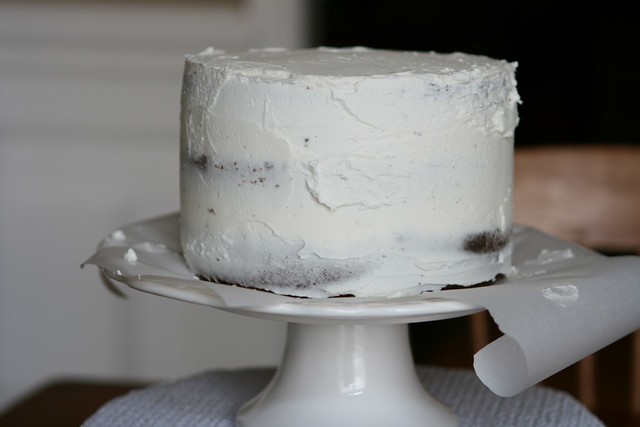
- Crumb Coated Cake
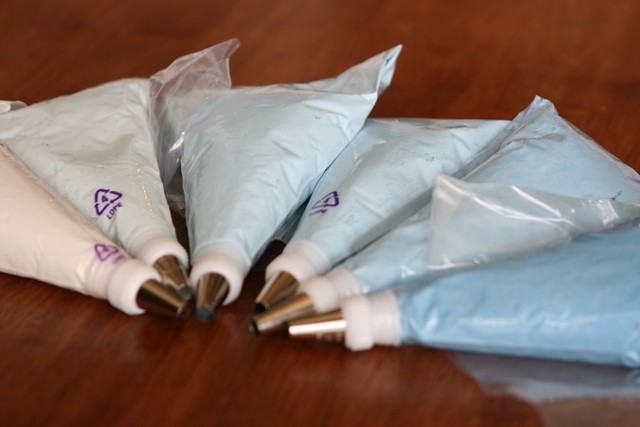
- Pastry Bag
- #12 Tip
- Icing, your choice of color
- Off-set spatula or small spoon
A messily crumb coated cake
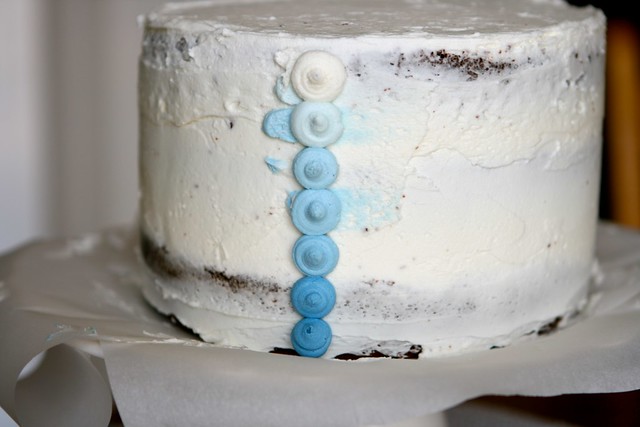
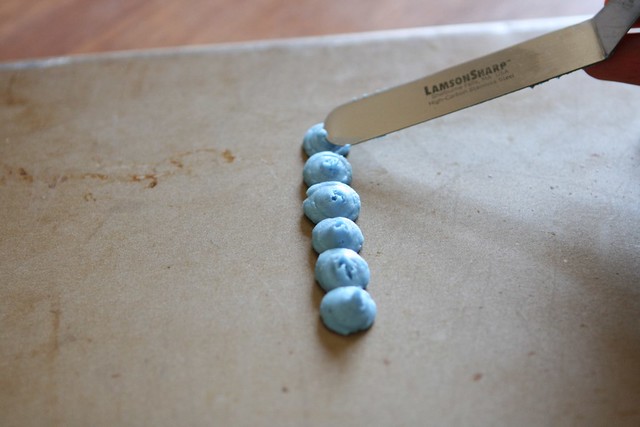
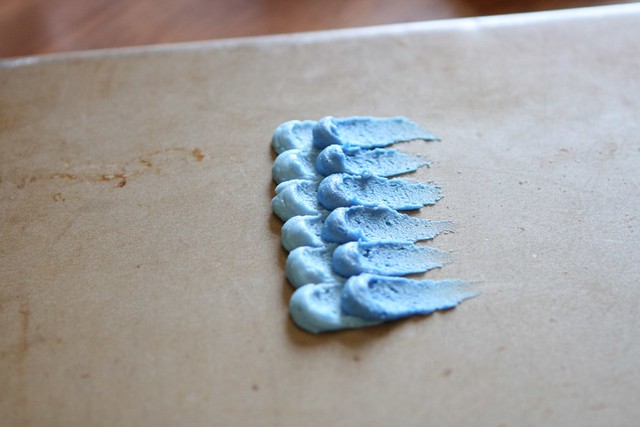
For the Ombre effect, take graduating color frosting with a #12 tip.
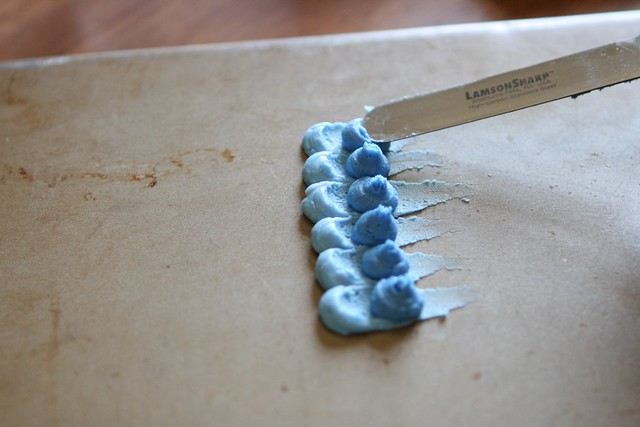
Pipe a vertical line of icing dots. If doing the Ombre effect, start with the lightest icing first.
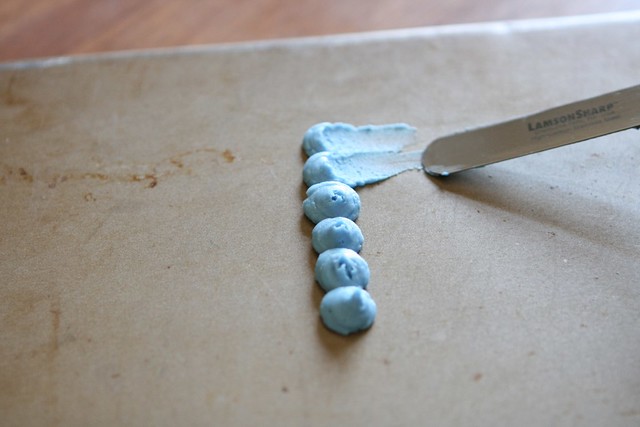
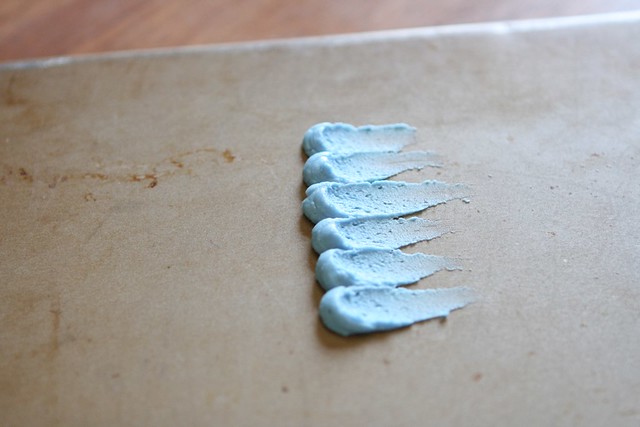
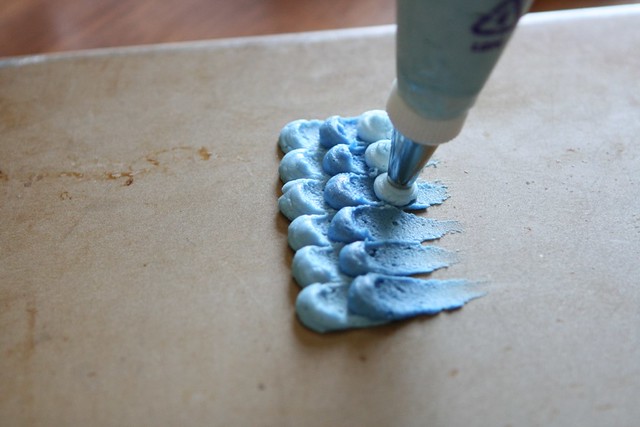
Place the off-set spatula in the middle of the dot, press down and drag.
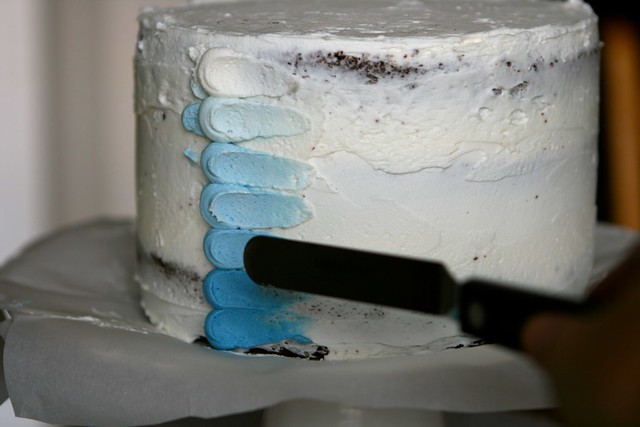
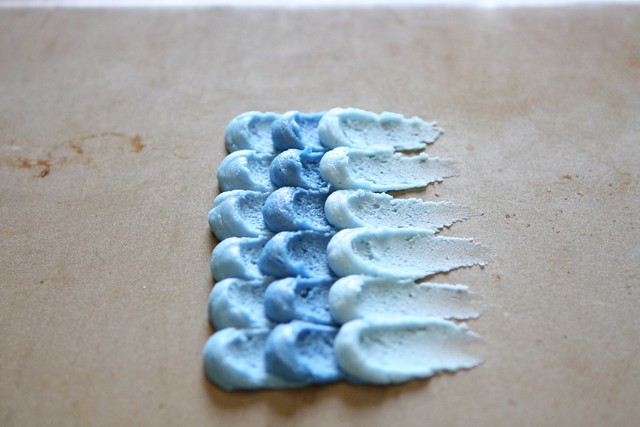
Continue around the cake
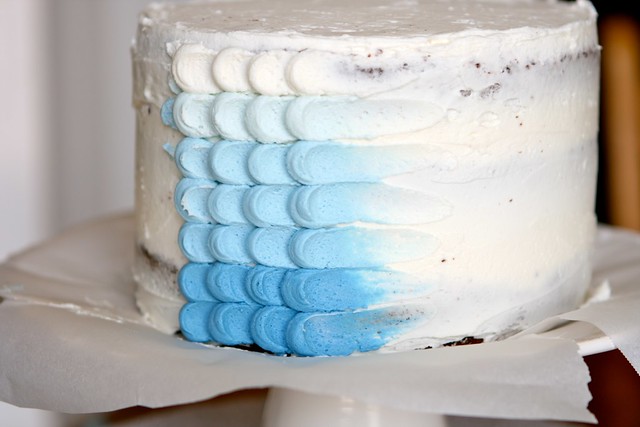
****I forgot to show how to “end” the cake. When you get to the end, just pipe the final vertical line of dots and don’t swipe. This will be the back of your cake. It really is not even that noticeable.*****
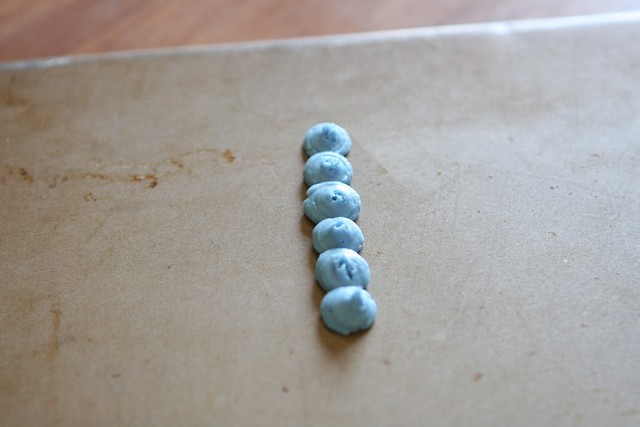
And if you want to see it off the cake..I got that for you too (not the ombre effect)!

Absolutely gorgeous cake, Leslie! Love the technique. Thanks for sharing it.
Beautiful! This would be great for Mother’s Day. Thanks so much for the tutorial!
I love this and really want to bake a cake now. 1 question though… what does the seam look like? I mean, how do you blend the frosting on the last dots you make? Or do you make a creative button look or something? Thanks!
Great question. I think I addressed the back of the cake in the video, but no worries.
You just “end” the cake with a vertical line of dots, there is no room to “swipe” them because you would run into the first line. So just use that as the back of the cake. It really isn’t that noticeable.
Just rewatched the video and I did not address how to “end” the cake. Ugg, so sorry. See the below reply
LOVE it! I will have to try this!
Beautiful! I’m going try it with Easter Pastels for this weekend. My question, what frosting did you use? Do you have the recipe for it on your blog? Thanks for sharing!!!
~Carly
Carly,
Thank you so very much for your comment. Strangely enough I have never put the recipe on the blog.
For this cake, I used a version of this icing.
Ingredients:
This icing is used for icing cakes and cookies as well as for borders and art work on cakes. It also makes a good tasting filling between layers of the cake and under a Fondant Icing. You can make roses out of Buttercream Icing, but the drying time is 3 or more days depending on the humidity.
2 sticks (1 cup) butter, room temperature
2 cups Crisco shortening
1/2 teaspoon salt
1 teaspoon butter flavoring (Wilton’s makes the best flavored version)
1 teaspoon pure vanilla extract (I use Wilton’s Clear Vanilla)
1/2 teaspoon almond extract
2 pounds powdered (confectioners’) cane sugar, divided*
1 tablespoon meringue powder (optional but the texture will be smoother)**
Water or milk as necessary (I usually add about 2 tablespoons but you may need more or less depending on the humidity in your neighborhood)
* 2 pounds unsifted powdered sugar = about 8 to 9 cups.
** You can purchase meringue powder at your local grocery store under the brand name of Just Whites.
Recipe is from Whats Cooking America.net I change the flavorings around a lot. But this is a nice crusting buttercream. The kids seems to like this frosting. It is really sweet and reminds me of frosting you would get at a bakery.
In my country there’s any Crisco shortening can I substitute that with something else?
You can use any brand of “all vegetable shortening”.
Wow what a lovely cake
Aarthi
YUMMY TUMMY
beautiful!!!! congratulations, it looks amazing!!!!!
Gorgeous cake! My family are testers too…not always willingly….haha. Happy birthday to your son! Love your videos!
This is such a great idea 🙂
Hilarious. Great video and here’s hoping there is no one getting their panties in a wad 😉
wow!!! is it really that easy…seriously??? This looks amazing & so creative!
This is so beautiful! This is one of my favorite decorating techniques, and the possibilities are endless. 🙂 I love your color choices!
AH-MAZING!! Absolutely stunning!! You are definitely gifted 🙂
I’ve been waiting for you to post a tutorial for this lovely cake you made!! So gorgeous!
Beautiful! Thanks you SO much for the tutorial. What a great post!
Those are some pretty intense icing skills you have there!
As wonderful as your tutorial is, I’m thinking there is NO way my version would look even half as good!! 🙂 Your cake turned out gorgeous!!!
OMG! I’m totally going to try this frosting technique at home! Maybe in a pink or green or yellow for Spring/Easter.
Thanks for sharing,
Charlie, 13 year old food blogger
This is so pretty! I’m not great at decorating cakes, but this looks like something I could actually tackle! Happy birthday to your son!
So gorgeous! I have a “thing” for ombre… and blue is my favorite color, so this is my kind of cake!! It reminds me of the ocean too! So, so pretty!
wow beautiful cake! great photos, really cool technique! : )
Wow! I just saw this on Foodista. Absolutely gorgeous!
You made this look super simple! Thanks so much for sharing!!! It’s a BEAUTIFUL cake!
This is amazing! You make this look so damn easy! Must try it although I know mine won’t turn out as beautiful as your cake. Thanks for sharing.
This cake is awesome. So awesome.
This is BEAUTIFUL!
I was just wondering if you had any advice for a novice decorator. I’ve been baking for years and because I’ve never been able to produce a clean cake, I just usually focus on the taste and flavor combinations. But how do you get your cakes so straight? Also, the dirty ice looks awesome as well, whenever I ice my cakes, there are always little flecks of cake in the icing, and I hate the way it looks. Any tips?
Thanks!
Thanks Isabel!
I am novice as well. One trick to getting a nice straight cake is to use cake pans with straight sides. Most cake pans that you but in normal stores have a slight slant to the sides. I use Fat Daddio cake pans and love them. I also freeze the cakes overnight so that when I do the crumb coat, the cake is less likely to get all “crumby”. Put the crumb coat on and them place the cake in the fridge for a while then put the final coat on. Another good trick is when you are trying to smooth out the sides, keep your offset spatula in a cup of hot water. This helps melt the frosting a bit and makes it super smooth! Hope these little tips help
You rock cake decorating! Great tutorial.
Hi
Tks for the tutorial. My question is how long do you need to complete the whole cake starting from piping the petal to end?
I made a 8″ 3 tier cake and it took about an hour to do the ombre effect. If you just did one solid color, it might not take as long because you don’t have to switch out the piping bag after each dot.
Oh my god I stumbled upon your cake via Twitter and I must say its absolutely beautiful! I am really impressed. Did you make the icing or buy it?
http://www.chefpriyanka.com
Thank you! No, I make my own frosting. I posted the recipe in one of the comments above.
Okay, this is the most amazing cake I have ever seen. And wow, do you have patience and skill. So beautiful! I tried to pipe one border on the edge of a cake yesterday and you can definitely tell where I started and ended. The beginning is nicely scalloped and then my handed started to hurt and it went downhill from there. Must try again and I love this technique.
Great tutorial Leslie! I love the look of this cake, I have never seen anything like it until now. Simply gorgeous =D
Stunning! Love the ombre, great technique!
gorgeous, leslie! i totally plan to use this technique–this is the first i’ve seen of it, and i love it!
How did I miss this post? I just saw this picture of the cake on Facebook and I wondered it you really made it and then I came here and I found it! Wow – I am seriously impressed – it looks PROFESSIONAL!
I made this cake yesterday!! I did a 3-layer chocolate cake with raspberry filling and buttercream in between each layer to dress it up a bit. Also, I changed the cake recipe a bit: using a box of mix, I used only 1 egg, doubled the oil and used melted butter instead, and used whole milk instead of water. Tastes like scratch!! Mine certainly does not look as good as this one but it was super fun to make and still looks great! Definitely will repeat this recipe!
I am so glad you enjoyed making the petal cake! I bet it turned out just beautiful!
This is beautiful! I am still working on my decorating skills. Maybe someday I can make one as pretty as this!
So happy I found this tutorial! It’s wonderful! Clear and concise with beautiful pictures. I made my husband a purple ombre cake last night for his birthday (flavored strawberry lemonade) – and I’m going to try this technique frosting it today. I plan on posting the cake on my blog (and regardless of how the frosting comes out – we won’t hold our breathe…I’m not very good with frosting) I’d like to link back to your blog for the instructions if that’s okay. 🙂
Here is the link to my post! Thanks so much for the instruction! 🙂
http://www.freakedoutnsmall.com/2012/04/purple-ombre-petal-cake.html
Love this cake! Thank you so much for posting it. I was planning on making a layered rainbow cake for my daughter’s 2nd birthday, but couldn’t think of how I wanted to decorate the outside. This worked perfectly! I ended up doing the petal design in all white icing, that way the rainbow layers really popped. This design really made the cake extra special!
You have created such a gorgeous cake! I’m inspired to practise piping and make one in pink.
Hi there! this is really helpful and beautiful! I would like to make this someday!:) What decorating tip did you use for piping the round icing? Thanks!
I used a size 12 tip
gorgeous cake! will have to try this sometime!!! 🙂 thanks for the tutorial!
I am so happy that I stumbled on your beautiful petal ombre cake. It is stunning and I’ll think I’m going to try it one of these days. Thank you for sharing. You ROCK!
Woooow! That’s one of the most beautiful cakes I’ve seen in my life! I just love it!!! I’m just starting to bake, but hopefully once I get more experience I will be able to do something similar! Thanks for sharing! And great tutorial! 🙂
Thanks so much for your sweet comment on my Ombre Petal Cake!!!!
It really is a forgiving frosting technique, I am sure it will look beautiful when you try it!
Hey Leslie,
I LOVED this idea and blue is my grandfather’s favorite color so I gave it a go myself and wanted to share my pics with you. This cake was the talk of the party!!
Gorgeous cake! Love how you made the petals! Will definitely try this one day ! 🙂 thanks for the tips!
This is gorgeous! Thanks for the tutorial.
I LOVE THE CAKE AND I AM GOING TO MAKE FOR A GROOMS CAKE, MY QUESTION IS BECAUSE I CANNOT WATCH VIDEO FROM WHERE I AM…EXPLAIN HOW YOU RECEIVED YOUR SPECIFIC COLORS….THANK YOU!
Gorgeous cake! You inspired me to try my hand at the technique. Here’s a picture of mine. http://24.media.tumblr.com/tumblr_m6g42u5Nn41qzfseeo1_500.jpg
Wow, this cake looks so elegant.. Thank you for sharing! 🙂
Love this cake! It looks amazing! My question is about storing…did you make it ahead of time and put it in the fridge? I want to make it the night before my husband’s party, but we live in a super humid place (MO) so I’m wondering if I’ll have problems with the dots melting/leaking into one another when I take it out the next day.
Thanks so much for your comment!
I live in Florida, so it’s super humid here too! Ugggg
Leaving it out all depends on what type of frosting you use. I use a crusting buttercream that is very sturdy, so it can handle the heat.
If you are using a swiss meringue buttercream or an all butter type of frosting, then yes, I would pop it in the fridge.
Happy Birthday to your hubby!
Great tutorial! I made a black and white version (http://tanadeidolci.blogspot.it/2012/10/pepita-chocolate-day.html) and it was a great success. Thank you so much!
Beautiful! Love the black and white
I was wondering what the dimensions of the cake is. I’d like to do an ombre effect for my daughter’s birthday cake. It looks like 6″ is the height from the picture(?)
Yes…I would say about 6-7 inches tall
Leslie,
Can you guestimate how much frosting you used? I will be purchasing pre-made buttercream to reduce prep time for the cake I am preparing. I will be practicing soon for my sister’s baby shower and would love some technique tips!
Thank you,
Veronica
Veronica,
Thanks for your comment/question.
I would say I used about 8-9 cups of frosting for this cake.
Thank YOU! I made a plain vanilla one, with layers of both chocolate and vanilla cake inside. Home-made all butter buttercream simply made with butter, icing sugar, milk and vanilla extract. Once it was crumb coated, it took about 30 minutes to decorate a three layer 6 inch cake. Thank you for giving me the confidence to try the petal technique – you are right, it is easy! I was really pleased with my lovely elegant cake. Ombré saved for another day!